DIY Puffy Unicorn Headband
DIY Puffy Unicorn Headband

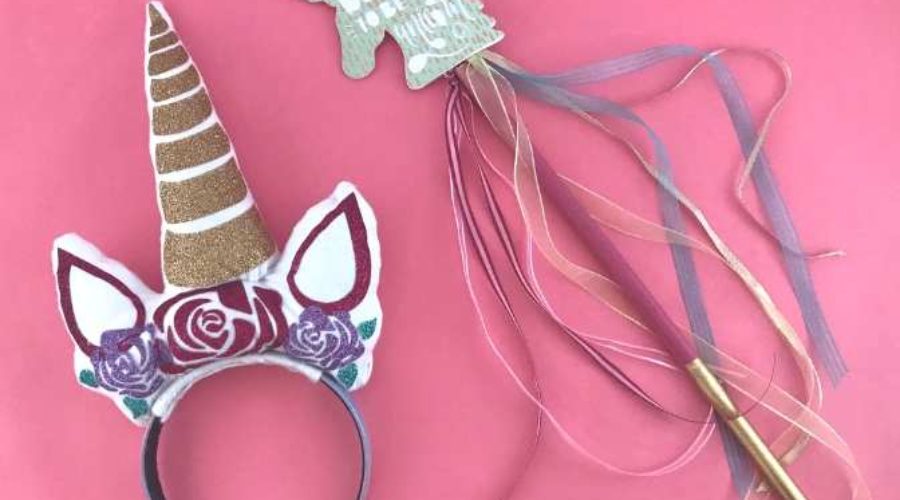
Don’t you love last minute projects that turn out better than expected? Me too! This cute and puffy unicorn headband is easy to make using your Cricut Explore and your sewing machine. It came together in under an hour, leaving me time to make the unicorn wand to go with it.
Crafting is my therapy (obviously) so I challenge myself to make gifts whenever possible. It’s a great way to use all those craft supplies that I just had to buy when they were on sale, and it’s fun!
Here’s what you need to make this soft and puffy unicorn headband:
- A headband. I highly suggest a headband that’s at least an inch or wider at the top–2″ is even better. You need a wider base to hold the puffy unicorn ears and horn in place.
- A unicorn svg cut file. For this one I used one of the free unicorn svg files on FreeSVGDesigns.com. They’re so generous with their free cut files!
- Cricut iron-on glitter. I used gold, hot pink, lavender, and turquoise.
- White fabric. I used leftover flannel, but any cotton fabric will work.
- Poly fiber stuffing. A money saving tip is to buy cheap pillows and use those for stuffing.
The first thing I did was resize my unicorn svg file to fit the headband, and the little girl who would be wearing it. I also ungrouped my unicorn cut file and deleted the eyelashes since I didn’t need that element to cut.
Like Cricut Projects? Check out all our Cricut Crafts.
Then I cut out the unicorn pieces on the Cricut iron-on glitter. Next, I ironed the pieces onto my flannel fabric.

I folded the flannel, right sides together (so the glitter iron-on is sandwiched between the flannel). And then I drew a line with a pencil around the design as a guide for sewing around the design. I also made little XXX’s along the bottom of the rose so that I wouldn’t forget to leave it open for turning.

Sew around the unicorn design, following the line. Don’t sew along the entire bottom–leave about 4 inches. Then cut your fabric around the sewing line, leaving about a 1/4″ of fabric all along it.

Turn your design right-side out. Stuff it tightly, making sure the horn will stay upright. I opted to tie string around the horn so it looked separate from the rest of the design, but honestly I can’t decide if it looks better than just stuffing the entire piece. I probably would have just left it as is if I made this same unicorn headband again.
Putting the unicorn head on the headband was probably the most difficult part of the project. It naturally wants to fall forward or backward, and doesn’t want to stay upright. I solved this problem by hot gluing the unicorn head to a strip of fabric that I then glued onto the headband. I wrapped the fabric around the inside of the headband so it looked nice and finished. I discovered that when the hot glue hardened, it created the perfect platform for the unicorn head to stay put.
And that’s it!
If you want to make the unicorn wand to go with it, then just choose a unicorn silouette from the Cricut Design Space image library. I cut two unicorn silouettes outs of a sturdy white glitter card stock. Then I painted a piece of dowel pink, screwed a small eyelet screw into the top and tied a bunch of fun colored ribbons to it. Glue the unicorn silouettes to the top of the wand, sandwiching them around the eyelet screw.
Nobody likes to craft alone (or is it just me?) Craft along with me and a group of fun, crafty women by joining our Crafting Is My Therapy Facebook Group! We do live events every month, so you’ll have no excuses not to get your crafty on!
Sign up for the craft group emails so you don’t miss an event!


